
REMOVAL AND INSTALLATION
- Disconnect the negative battery cable.
- Remove the master cylinder reservoir cap, then remove the 2 / 3 of the fluid from the reservoir with a clean syringe and place it in a suitable container. Install the reservoir cap.
- Raise and safely support the vehicle with jackstands.
- Mark the relationship of the wheel to the hub and bearing assembly.
- Remove the tire and wheel assembly.
- Reinstall two of the lug nuts to retain the rotor.
See Figure 1


Fig. Fig. 1: Installed view of the brake caliper and related components
- Push the pistons into the caliper bore to provide clearance between the linings and the rotor, as follows:
- Install a large C-clamp over the top of the caliper housing and against the back of the outboard shoe.
If the C-clamp is tightened too far, the outboard shoe retaining spring will be deformed and require replacement.
See Figure 2

Fig. Fig. 2: Bottom the caliper piston in its bore using a large C-clamp
- Slowly tighten the C-clamp until the pistons are pushed into the caliper bore enough to slide the caliper assembly off the rotor.
See Figure 3

Fig. Fig. 3: You can also use a large pair of channel type slip joint pliers to compress the caliper piston into its bore
- If the caliper is going to be replaced or removed for overhaul, disconnect and plug the brake hose.
- Unfasten the caliper mounting bolts and sleeves, then pull the caliper from the mounting bracket and rotor. Support the caliper with a suitable piece wire from the strut, if not removing.
See Figures 4, 5 and 6

Fig. Fig. 4: Unfasten the 2 caliper mounting bolts. On some vehicles, you may need to use a Torx® driver to unfasten the bolts

Fig. Fig. 5: Pull the caliper mounting bolts from their sleeves

Fig. Fig. 6: Lift the caliper up and off the rotor
- Inspect the mounting bolts and sleeves for corrosion and the support bushings for cuts or damage; replace if necessary.
- Fill both of the cavities in the caliper housing between the bushings with silicone grease. If removed, install the pads in the caliper.
See Figures 7 and 8

Fig. Fig. 7: Lubricate the caliper mounting bolts with a suitable grease
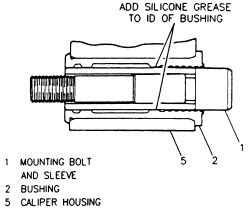
Fig. Fig. 8: You must lubricate the inside of the caliper housing cavity
- Position the caliper and brake pad assembly over the rotor.
- Install the mounting bolts and sleeves. The bolts and sleeves should slide through the bushings with only hand pressure. If greater force or mechanical assistance is necessary, perform the following:
- Remove the bolts and sleeves, along with the bushings.
- Inspect the mounting bores for corrosion. If the bores are corroded, remove it using a 1 in. (25mm) wheel cylinder honing brush.
- Clean the bores with denatured alcohol.
- Install the bushings and relubricate.
- Tighten the caliper mounting bolts to 38 ft. lbs. (51 Nm).
- If removed, unplug and connect the brake hose. Tighten the inlet fitting to 33 ft. lbs. (45 Nm).
- Remove the two wheel lugs, and install the wheel and tire assembly.
- Carefully lower the vehicle.
- Fill the master cylinder. If the brake line was disconnected, bleed the brake system as outlined in this section.
- Check for hydraulic leaks. Pump the brake pedal a few times before moving the vehicle.
Some vehicles may be equipped dual piston calipers. The procedure to overhaul the caliper is essentially the same with the exception of multiple pistons, O-rings and dust boots.
- Remove the caliper from the vehicle and place on a clean workbench.
Depending upon the vehicle, there are two different ways to remove the piston from the caliper. Refer to the brake pad replacement procedure to make sure you have the correct procedure for your vehicle.
- The first method is as follows:
- Stuff a shop towel or a block of wood into the caliper to catch the piston.
- Remove the caliper piston using compressed air applied into the caliper inlet hole. Inspect the piston for scoring, nicks, corrosion and/or worn or damaged chrome plating. The piston must be replaced if any of these conditions are found.
See Figures 9 and 10

Fig. Fig. 9: For some types of calipers, use compressed air to drive the piston out of the caliper, but make sure to keep your fingers clear

Fig. Fig. 10: Withdraw the piston from the caliper bore
- For the second method, you must rotate the piston to retract it from the caliper.
- If equipped, remove the anti-rattle clip.
See Figure 11

Fig. Fig. 11: On some vehicles, you must remove the anti-rattle clip
- Use a prytool to remove the caliper boot, being careful not to scratch the housing bore.
See Figures 12 and 13

Fig. Fig. 12: Use a prytool to carefully pry around the edge of the boot ...

Fig. Fig. 13: ... then remove the boot from the caliper housing, taking care not to score or damage the bore
- Remove the piston seals from the groove in the caliper bore.
See Figure 14

Fig. Fig. 14: Use extreme caution when removing the piston seal; DO NOT scratch the caliper bore
- Carefully loosen the brake bleeder valve cap and valve from the caliper housing.
- Inspect the caliper bores, pistons and mounting threads for scoring or excessive wear.
- Use crocus cloth to polish out light corrosion from the piston and bore.
- Clean all parts with denatured alcohol and dry with compressed air.
- Lubricate and install the bleeder valve and cap.
- Install the new seals into the caliper bore grooves, making sure they are not twisted.
- Lubricate the piston bore.
- Install the pistons and boots into the bores of the calipers and push to the bottom of the bores.
- Use a suitable driving tool to seat the boots in the housing.
See Figure 15

Fig. Fig. 15: Use the proper size driving tool and a mallet to properly seal the boots in the caliper housing
- Install the caliper in the vehicle.
- Install the wheel and tire assembly, then carefully lower the vehicle.
- Properly bleed the brake system.
See Figure 16

Fig. Fig. 16: There are tools, such as this Mighty-Vac, available to assist in proper brake system bleeding
To Order car parts online:--To get heavy discount on car parts .Click this link below:----
http://technoanswers.blogspot.com/2011/05/from-where-to-order-car-parts-online.html
For car error code diagnosis click the link below:---
http://www.automd.com/diagnose/?amdcid=apwldrbrd1
Car no start:--
http://technoanswers.blogspot.com/2011/05/car-will-turn-over-but-will-not-start.html
how to change the brake rotor on Chevy Lumina?
For instructions regarding.
how to change the brake drum on Chevy Lumina?
For instructions regarding:---
how to change the brake shoes on Chevy Lumina?
for instructions regarding:--
how to change the drum brakes on Chevy Lumina?
For instructions regarding:--
how to change the wheel cylinder on Chevy Lumina?
For instructions regarding:---
