
Once you have found TDC, if you are not familiar with the chevy small block firing order, review the page on firing order. This page will provide the information on how to position the distributor.
How to find TDC, or top dead center
OK, you've taken the motor apart on your classic chevy. Dis-assembling the motor is certainly the easy part while working on a chevy small block. I'll bet you took the motor apart with the thought in the back of your mind, "I'll figure out how to find tdc later when it's time for reinstalling the distributor". Now it's time for re-assembly and you need to install your distributor.
What is TDC?
Top dead center is when the number one piston is at the top of it's compression stroke.
You will need to find TDC, or top dead center, in order to re-install the distributor in your classic chevy small block engine so that the distributor striker is in the number one position at the same time the number one piston is at the top of it's compression stroke. If your intent is to install the distributor, you won't be able to use the distributor as a reference point, instead you need to refer to the harmonic balancer and find the timing mark.
When you find TDC, this will ensure you start off with your ignition timing as close to zero degrees as possible when it comes time to start the engine. If your ignition timing is not close enough, the motor may not start at all.
Do I need fancy tools?
No. I will show you how to do this with a minimum of tools. Unlike some other articles on the internet that require degree wheels, dial indicators (depth micrometers), or manometers, you can get by on old school know - how for this one.
How accurate is this method?
Your need for absolute accuracy depends on what you are trying to achieve. If you are building a racing engine, you should use precision tools that allow you to account for inaccuracies in the machined parts. If you simply want to install a distributor so that you can get your motor running in your classic car, then this method will do the trick.
This method will allow you to accurately find TDC as long as you do not have any significant damage to the harmonic balancer or the key and keyway, the timing chain, or the timing tab is not bent. On a 64 Impala, and most classic cars in the 60's, the harmonic balancer was made from a single piece of steel so the timing mark will always be in the same place. However, in later years, the harmonic balancer was built with a vibration damper ring and the timing mark was on the damper ring. As the balancer/damper got older and the vibration damping rubber between the balancer and the damper ring started to fail, the timing mark could move. If you have such a harmonic balancer on your motor then this method is "potentially" flawed since you will use the timing mark on the harmonic balancer as your tdc indicator or reference.
Let's get started!
Find the timing mark on the harmonic balancer. You may need to clean the harmonic balancer to find it.
Remove the number one spark plug. This is somewhat optional. If you loosen the spark plug so that air can escape from the cylinder, then you can hear the air bleed past the threads when the number one cylinder is coming up to the compression stroke. If you decide to completely remove the spark plug you can put a finger over ( not in ) the spark plug hole. This will enable you to feel the air being forced out of the cylinder as the piston compresses it. Using a finger to cap the hole does not work well when the motor is hot though.
If you have a remote starter button, connect it to the starter terminals. One clamp goes on the starter solenoid's small wire terminal closest to the motor, the other clamps to the battery cable terminal on the starter solenoid. Use the starter button to crank the engine over in short bursts.
If you do not have a remote starter button, use a small flat blade screwdriver to short the 2 terminals together. When you have the starter right in front of you, it can be rather loud so you will need to pay attention to the sound of the compressed air escaping from cylinder number one.
If you use the screw driver method and completely remove the spark plug, you may need someone's assistance to either short out the solenoid or put their finger over the spark plug hole.
Once you hear the air escaping this means the piston is coming up to tdc. The air does not escapse quickly, it tends to bleed out if the spark plug is still in the hole. Stop turning it over.
Locate the timing mark on the harmonic balancer. You may need to crank the engine a few times to get it to come around to the timing mark on the timing tab. Don't expect it to stop at tdc, you will be lucky if that happens. You may need to turn the harmonic balancer manually towards or back to tdc.
Bring the timing mark on the harmonic balancer in line with the 0 degree mark (tdc) on the timing tab. You will notice several lines on the timing tab. The thickest line is 0 degrees and each line represents 2 degrees. Clockwise ( looking at the engine ) of this line is past tdc which would mean your timing is retarded, and counter clockwise is before tdc which would mean your timing is advanced. Note how the picture of the timing tab on this 283 chevy small block denotes tdc with a "0" for zero degress advance, and an "A" so you know which side of zero is advance.
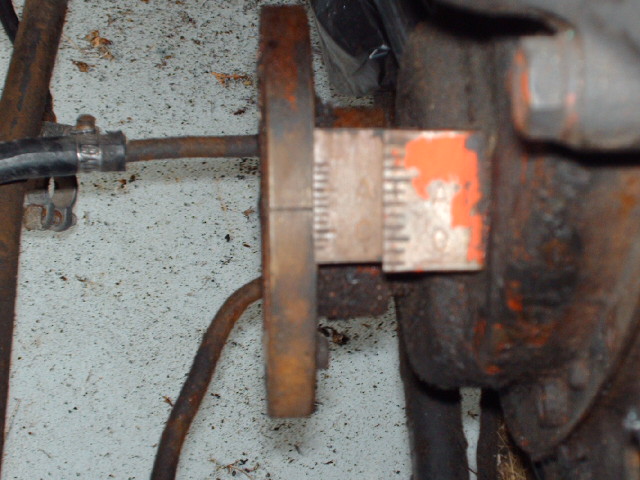
Most chevy small blocks will run just fine when initially set to 4-6 degrees advanced. Advanced means the ignition system will send spark to the spark plug before the piston reaches tdc.
How the distributor works
Understanding how to install the distributor correctly requires a bit of basic knowledge of how the distributor works. This is pretty simple so don't get scared. I'll cover the basic mechanicals here, not the spark distribution.
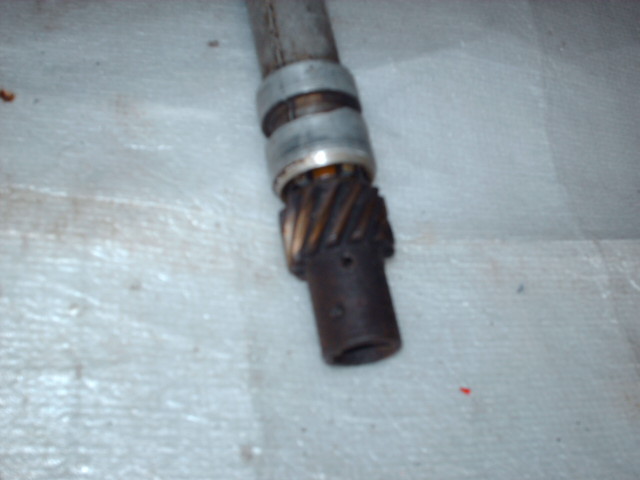
Note the direction of the twist in the teeth of the gear. In order for the distributor to mate with the gear on the cam shaft, the distributor shaft needs to rotate clockwise. When it is removed, the distributor shaft will rotate counterclockwise.
Now look in the bottom end of the distributor. Notice the gear has a

key 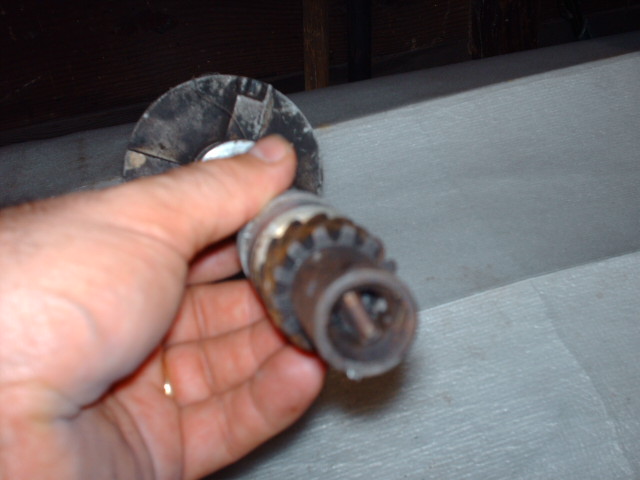
The objective when installing the distributor is to get the stiker on the distributor rotor in the 6:30 position and the oil pump drive key mated to the oil pump drive shaft in that position. What typically happens is you can get the distributor installed but not in the 6:30 position. This is the one task that makes most people lose their minds, becoming frustrated and angry.
Don't forget the number one cylinder firing position on the GM HEI distributor is at 5:30 on the clock face, not 6:30 like the classic chevy breaker points distributor. You will find that these distributors are interchangeable when you position the rotor where it belongs for each.
I'll show you how to accomplish both in under a couple of minutes. It might take you a bit longer since you are just learning this, but you shouldn't find it frustrating.
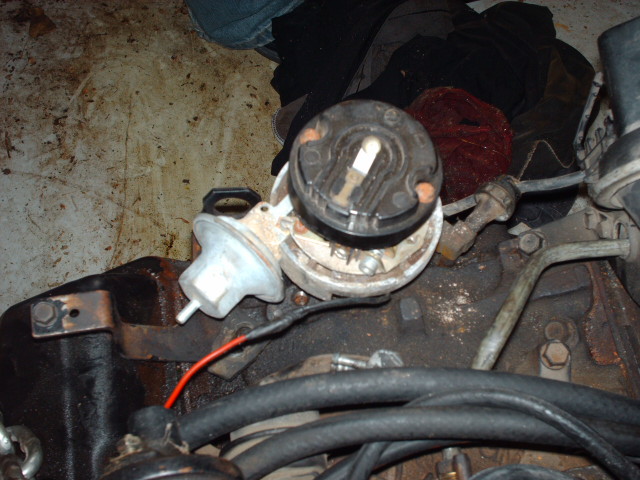
Finally... Install the distributor
Take note of the following videos. I perform this installation for you on an old chevy 305 small block engine I pulled out of my 86 GMC after it siezed.
Let's qualify your need to go through this first. If you brought the engine to TDC before pulling the distributor, installing the distributor will be a breeze. You won't need to worry about working through the process of aligning the oil pump drive key. You may be able to simply re-insert the distributor in the correct position.
If you don't have a very long flat blade screw driver to align the oil pump drive shaft, you can get it into the correct position by following a simple procedure, although it takes a while to work your way through it.

Unless you are very lucky or haven't turned the motor over since you removed the distributor, it will not go all the way in on the first try. You will have approximately a 1/4 inch of space between the intake manifold on the shoulder of the distributor base when it appears to have bottomed out. This is because the oil pump drive shaft is not lined up with the drive key at the bottom of the distributor, preventing the distributor from falling all the way down.
If you turn the rotor counter-clockwise while holding the vacuum advance, the rotor and distributor housing will rise and then drop. This is the effect of the diagonal gear teeth on the cam gear riding up until it clears the circular teeth on the camshaft.
Keep doing this until the oil pump drive shaft aligns and the distributor shaft will fall all the way in. The rotor won't necessarily be in the correct position though. This will be the position you will begin from.
Now...Keep these thoughts in the back of your mind.
- The oil pump drive key will mate with the distributor in 2 different directions, 180º apart.
- There are 12 gear tooth positions around the circumference of the distributor drive gear. Count them as you turn the rotor.

For every full revolution, the distributor will be fully seated an extra 30º clockwise bringing you closer to the number one firing position.

--------------------
But if timing chain is quite perfect and there is spark and coil is having power, then its faulty distributor causing the problem.
